beginners
How to Find Fossils Near Me for Beginners (10 Practical Tips)
7 June 2026
The single most useful thing a beginner can do before a fossil hunting trip is read one site-specific guide carefully. Not a general introduction to paleontology, not a book about famous fossil discoveries — a guide that tells you exactly what formations are exposed at the site you're visiting, what fossil types occur there, and what those fossils look like in the field. That step alone makes a first trip five times more productive than going in blind.
What follows is the advice experienced collectors give beginners. Not theory — practical field habits that change what you come home with.
How to find fossils near you
Fossils are not distributed evenly. They occur in specific sedimentary rock units of specific ages, deposited in specific environments. Knowing what's under your feet is the difference between a productive trip and a wasted afternoon. Three free resources will do the work for you.
Step 1: Use Macrostrat to identify the bedrock under your address. Macrostrat is a National Science Foundation–funded interactive geologic map maintained at the University of Wisconsin–Madison; it aggregates more than 2.3 million bedrock geologic map units from over 200 published map sources. Drop a pin on your home, town, or a candidate field site and Macrostrat tells you the rock unit name, age, and lithology. If the unit is sedimentary and marine, freshwater, or lagoonal in origin, fossils are at least possible.
Step 2: Cross-reference the unit name against the USGS National Geologic Map Database. The NGMDB at ngmdb.usgs.gov is a USGS-and-state-survey-cooperative archive of more than 100,000 geologic maps and reports. Search by formation name. The map source publications often list the fossils documented in each unit and the field localities studied.
Step 3: Read your state geological survey. Each state survey publishes regional fossil-collecting guidance specific to its bedrock. The California Geological Survey maintains an interactive Geologic Map of California with formation-by-formation summaries. The Ohio Department of Natural Resources Geological Survey publishes a Fossil Collecting in Ohio guide that names productive sites and explains what each one produces. The New York State Museum maintains the Hamilton Group reference collection and publishes companion guidance for Devonian sites across western and central New York.
If you're not sure where to start, go to a managed public collecting site for your first few trips. Caesar Creek State Park (Ohio, Ordovician), Mineral Wells Fossil Park (Texas, Pennsylvanian), Penn Dixie (New York, Devonian), and the Gulf Coast beaches at Venice and Caspersen (Florida, Miocene) all have well-mapped geology, posted access rules, and a high probability of finding something on a first visit.
US collecting law in one paragraph
Federal land splits two ways. On Bureau of Land Management and US Forest Service land, the BLM's casual-collection rules under the Paleontological Resources Preservation Act of 2009 allow you to take up to 25 pounds of common invertebrate or plant fossils per day, plus one piece of petrified wood per day per person (annual maximum 250 pounds of petrified wood), for personal non-commercial use — no permit required. Vertebrate fossils (dinosaurs, mammals, fish, reptiles, trackways, and uncommon plant/invertebrate fossils) require a research permit on the same land. National Park Service land is more restrictive: the NPS prohibits all fossil collecting inside Parks and Monuments under PRPA (16 U.S.C. §§ 470aaa to 470aaa-11). State land varies — Florida requires a $5/year Florida Fossil Permit from the Florida Museum of Natural History for vertebrate fossils on state land but allows shark teeth and invertebrates without a permit. Always check the specific land designation before collecting.
Read the site before you visit
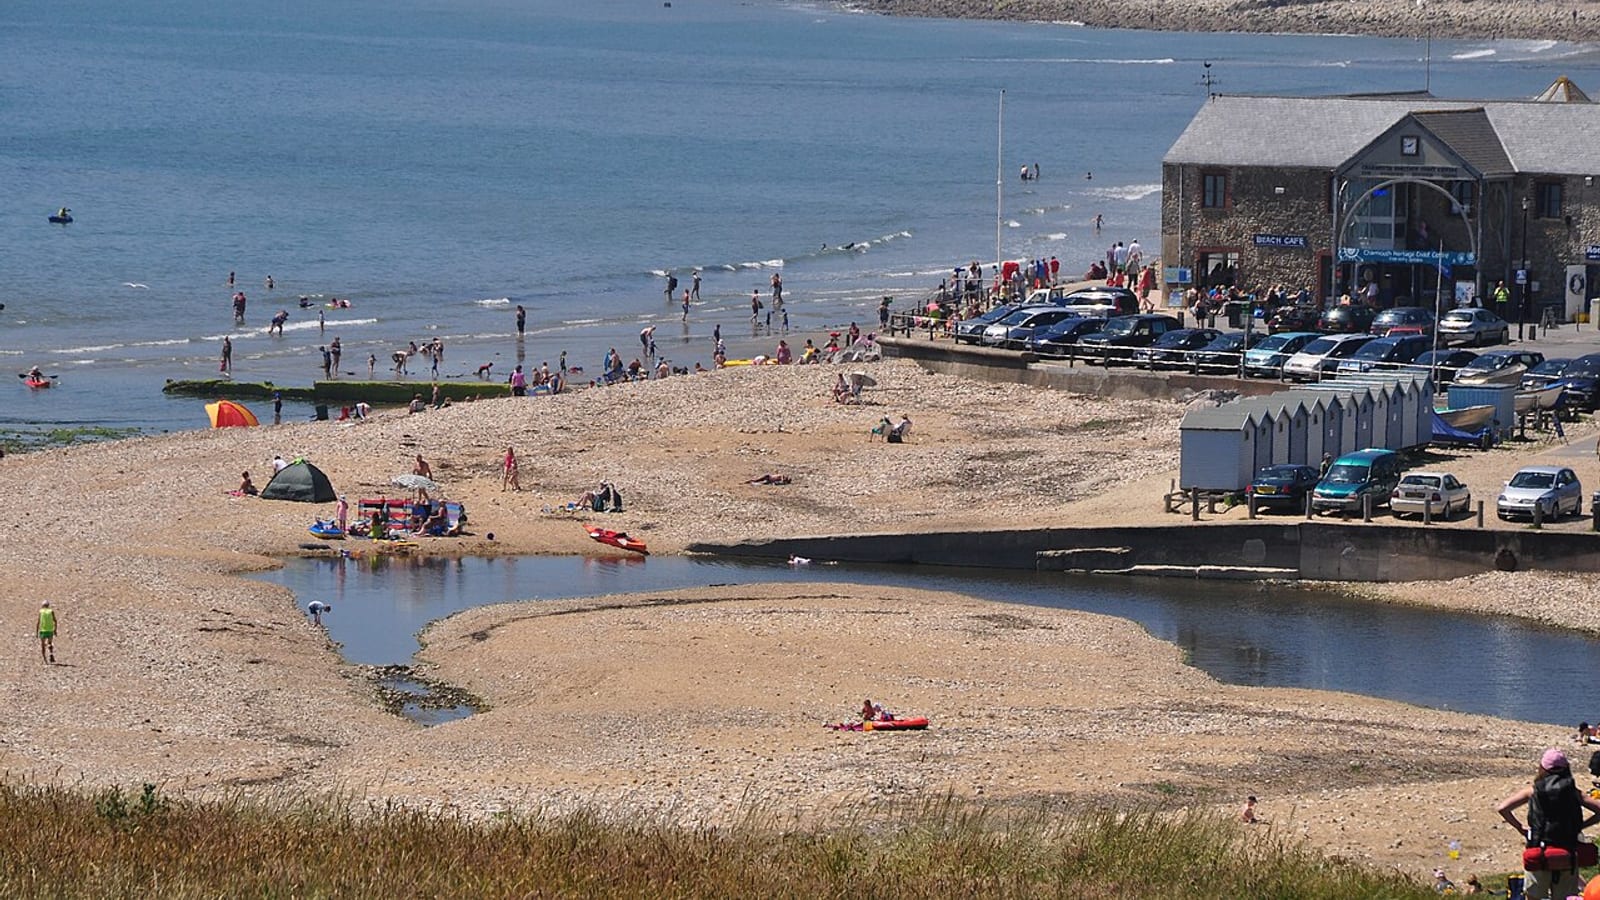
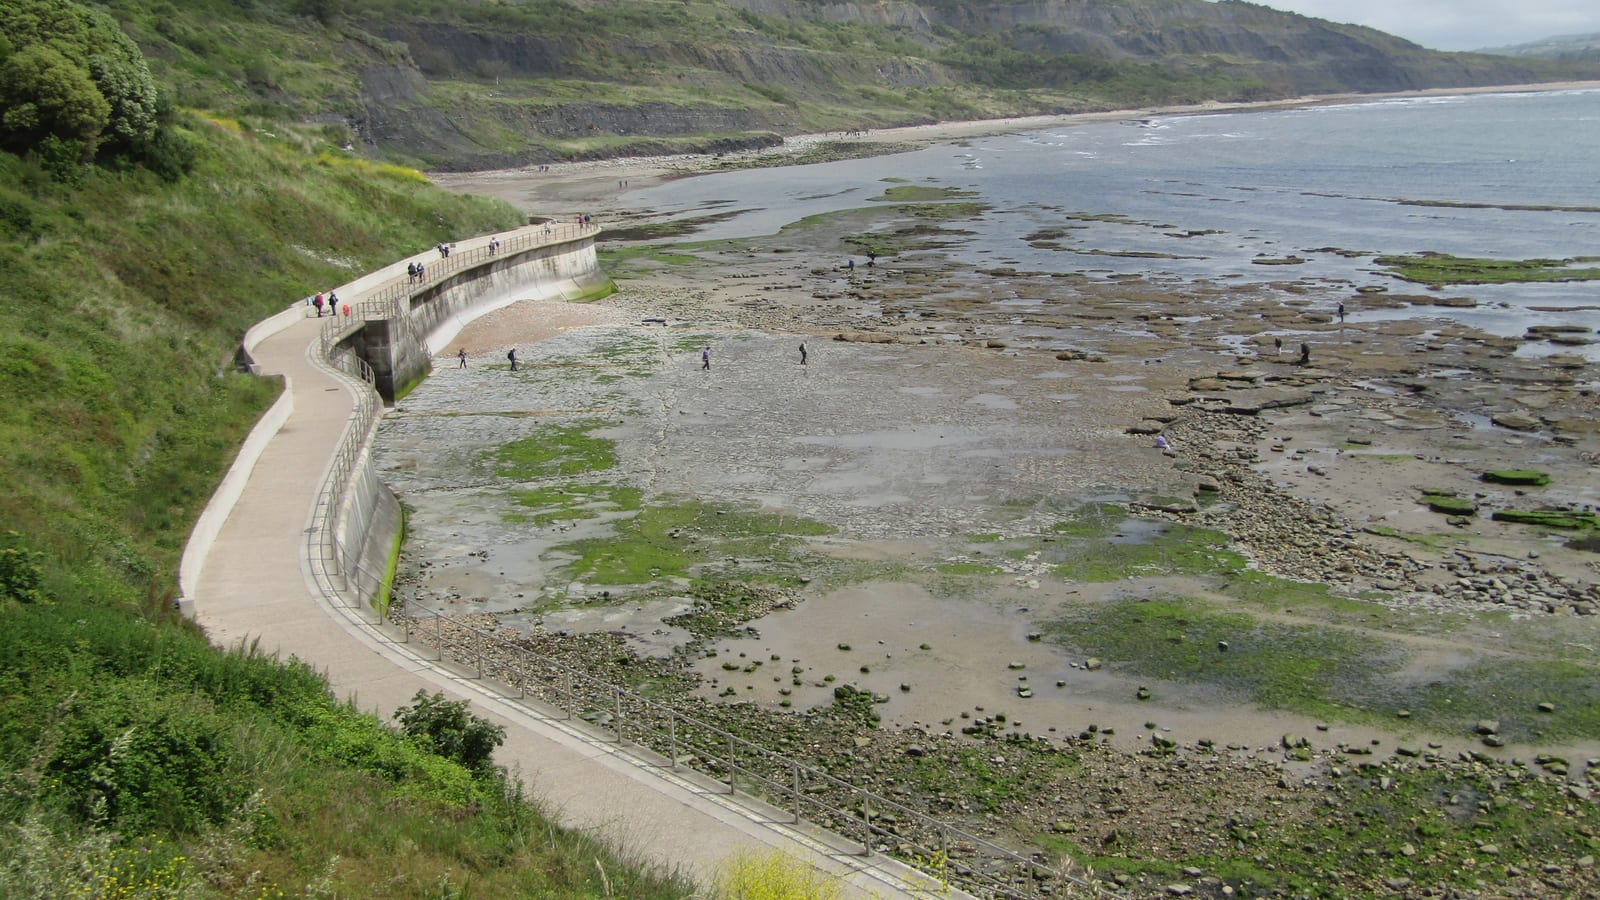
Every site produces different fossils from different rock types. Charmouth in Dorset produces ammonites and belemnites from Blue Lias and Charmouth Mudstone — dark grey nodular limestone and shale that most beginners walk past looking for the wrong colour. Caesar Creek State Park produces brachiopods and trilobites from Ordovician limestone roughly 450 million years old — flat grey rock that looks plain until you get close. Knowing what you're looking for, and what the host rock looks like, is the difference between a productive trip and an empty bag.
Spend the first 20 minutes just looking
The biggest mistake beginners make is picking things up too quickly. Before you collect, walk the site and look at what's there. You're building a mental model: which layers are producing material, what colour and texture the host formation has, where productive material is concentrated. On a foreshore site, the productive zone is often tight — a band of a few metres between the cliff base and the sea. On a limestone park site, it's specific beds within the exposed rock. Finding that zone in the first 20 minutes pays off for the rest of the trip.
Work the foreshore at low tide
At UK coastal sites, the foreshore below the high-water mark is where the finds are. This zone is cleaned by each tide, which exposes new material constantly. The productive window is roughly two hours either side of low water. Check tide times from the UK Hydrographic Office or the BBC Weather site for the specific beach and date, not just general guidance for the region. Low tide at Charmouth is not the same as low tide at Whitby. Arriving 90 minutes before low tide and leaving 60 minutes after gives you the full productive window and a safe exit.
Use a hand lens from the start
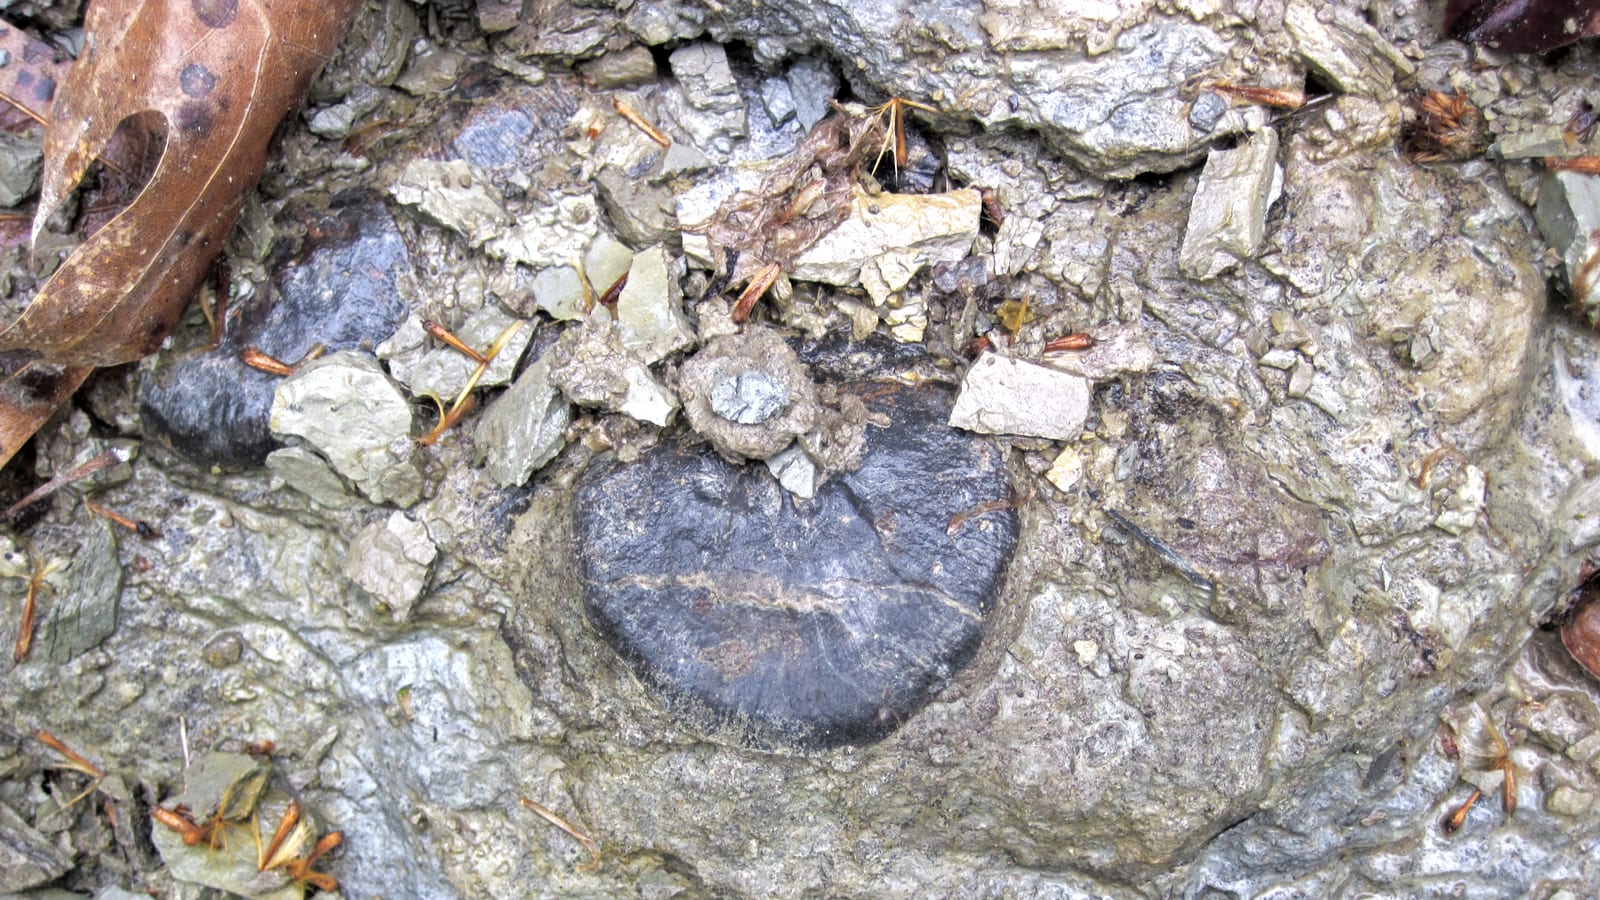
A 10× hand lens costs $15–$25 and reveals the biological structure that distinguishes fossils from rocks. Under magnification, an ammonite's suture lines are unmistakable — sinuous, complex curves no mineral formation produces. Bone shows porous cancellous texture. Belemnites show longitudinal fibres at a broken end. Without a lens, you're guessing; with one, you're identifying.
Think about the rock, not just the specimens
Fossils come from specific beds. If you're finding ammonites, you're in the right layer — work along it horizontally rather than moving to a different area. At sites where the geology is tilted or folded, a productive layer can appear as a narrow band on the surface and thicken further along the cliff base. This is the habit that separates productive collectors from ones who find things by chance.
Don't dig at protected sites
In the UK, fossil collecting on SSSI-designated foreshore is legal for surface material — the loose material already released by erosion. Hammering or excavating the cliff face is prohibited under the Wildlife and Countryside Act 1981 and the management agreements for most coastal SSSIs. Beyond the legal issue, hammering cliff faces dislodges material overhead and is a safety hazard. The productive material at Charmouth, Whitby, and Lyme Regis is in the fallen scree, not in the cliff face.
Keep records from your first find
Note the site, date, rock type, and approximate position for anything you collect. At minimum, put a label in the bag with each specimen. This matters for identification (knowing the formation narrows the species possibilities dramatically) and for scientific value (a fossil with provenance is useful; one without is just an interesting rock).
Don't overlook common finds
Beginners walk past belemnites waiting for ammonites; they overlook brachiopods waiting for trilobites. Common fossils are not lesser finds — they're what makes a site productive and they teach you to read rock accurately. At Charmouth, most visitors find a belemnite guard in the first 30 minutes. The belemnite is a real fossil, 180–200 million years old, from an extinct squid-like animal. It's worth keeping, wrapping, and labelling.
Find sites near you
The fastest way to find a productive site near where you live is to filter the GFH site directory by state or country and read the entries for the closest options. Below are the strongest first-trip picks by region.
- California fossil sites — Capitola Beach, Bolinas Lagoon, Shark Tooth Hill, and the California guide
- Florida fossil sites — Venice, Caspersen, Englewood, and the Florida guide
- New York fossil sites — Penn Dixie and the Devonian Mohawk Valley outcrops
- Ohio fossil sites — Caesar Creek, Trammel, Fossil Park Sylvania, and the Ohio guide
- Texas fossil sites — Mineral Wells and Dinosaur Valley
- Maryland fossil sites — Calvert Cliffs and Purse State Park
- Pennsylvania fossil sites — Montour Preserve Fossil Pit
- Utah fossil sites — U-Dig and Cleveland-Lloyd
- Wyoming fossil sites — Kemmerer pay-to-dig Green River fish quarries
- Arizona fossil sites — Petrified Forest viewing and the Kaibab/Martin Paleozoic units
Set realistic expectations for your first trip
First-time visitors to Charmouth regularly find belemnites; many find ammonite fragments; some find complete ammonites. First-time visitors to Caesar Creek reliably find brachiopods; trilobites are possible but less common. These are good outcomes for a first trip. Dinosaur bones and marine reptile material exist at some of these sites but are rare and typically require preparation experience to recognise in the field.
The hobby builds slowly. The site knowledge, geological understanding, and pattern recognition that make experienced collectors productive take several seasons to develop. Go regularly, keep records, study your finds, and the rarer material becomes findable.
Where to go next
For first-trip guidance on what to look for at the most beginner-friendly UK sites, the Dorset guide covers Charmouth and adjacent sites in detail. For the best US states overall, the GFH best places to fossil hunt in the United States ranks the top destinations by region. The beginners hub on GFH covers kit, rules, and identification basics for first-trip collectors.
Frequently asked questions
- How do I find fossils as a beginner?
- Start with the geology under your feet. Open Macrostrat (macrostrat.org), a National Science Foundation–funded interactive geologic map maintained by the University of Wisconsin–Madison, and look up what rock unit you're standing on. Sedimentary rocks of marine or freshwater origin are the ones that produce fossils. Cross-reference the unit name against the US Geological Survey's National Geologic Map Database (ngmdb.usgs.gov) or your state geological survey, which will tell you what fossils are documented in that unit. Then go to a managed public site — Caesar Creek (Ohio), Mineral Wells (Texas), Penn Dixie (New York), or the Florida Gulf Coast beaches — for your first trips, where the geology is already mapped and the access rules are clear.
- What tools do beginners need?
- Bring a 10× hand lens ($15–$25), a mesh bag or bucket, tissue paper to wrap finds, and waterproof boots. At UK beach sites, you also need current tide times. You do not need a geological hammer for foreshore collecting — productive material is already loose on the beach. For US sites, a small hammer and a flat chisel are useful at exposed shale outcrops (Penn Dixie, U-Dig), but not at managed parks where surface collecting is the rule. Eye protection is not optional when splitting shale.
- Where can I legally collect fossils in the US?
- On Bureau of Land Management (BLM) and US Forest Service land, the casual-collection rules under the Paleontological Resources Preservation Act allow reasonable quantities of common invertebrate and plant fossils for personal, non-commercial use without a permit — up to 25 pounds of non-vertebrate material per day plus one piece of petrified wood per day per person. Vertebrate fossils, including dinosaur material, require a research permit. National Parks and Monuments prohibit all fossil collecting. State land rules vary; in Florida, vertebrate fossils on state land require a $5/year permit from the Florida Museum of Natural History. Always confirm the specific land status before collecting.
- What does a fossil look like in the ground?
- Most fossils look nothing like museum specimens. In the field, they appear as partial impressions, casts, or fragments embedded in or eroding from rock. Use a 10× hand lens to look for biological structure: ammonites have sinuous suture lines, bone shows a porous cancellous texture, trilobites have a clear three-lobed symmetry, and shark teeth have a dense, smooth enamel crown distinct from the porous root. Most field finds are isolated parts — a single trilobite cephalon, a brachiopod valve, a crinoid stem ossicle — rather than complete animals.
- What should I do when I find a fossil?
- Photograph it in place before you move it. Note the site name, date, rock type, and approximate position. Wrap delicate specimens in tissue paper or newspaper. If you're collecting on BLM or USFS land, check the daily limit. If you find a vertebrate fossil on federal land, leave it in place and report it to the relevant BLM or USFS office — vertebrate fossils on federal land may not be collected by the public. If you find something exceptional (an articulated skeleton, a complete trilobite trace, a soft-tissue impression), photograph it, mark the location, and contact your state geological survey or a regional museum rather than trying to extract it yourself.